This is part 5 of my quest to explore Azure Functions for self-education in functions-as-a-service. The goal of this post is to successfully deploy and update a simple Azure Function by placing code in an existing Azure Repo and use Azure Pipelines to automatically build and release the code changes into production.
Back in part 1, we explored Azure Functions and Function Apps via the Azure portal. In part 2 we explored deploying function code to Azure directly from VS Code. In part 3 we wired up VS Code with source control using Azure Repos but didn’t make it to Azure Pipelines. In part 4 we explored some differences in C# and C# script code that pop up when creating / editing Azure Functions in the Azure portal compared to leveraging VS Code which are foundational for getting Azure Pipeline settings correct. Now that we’ve reviewed, let’s get to work!
In my last post, we left our brave adventurers in the Azure Deployment Center with some decisions to make about the build process once source code hits the Azure Repo networknerd-repo1. At present, we have a shiny new Function App named networknerd3 which contains no functions. There are many pages of documentation about Azure Pipelines out there, but there aren’t many that discuss using VS Code with Azure Repos and Azure Pipelines specifically for Azure Functions.
It Starts with VS Code
We’ll begin by returning to VS Code just as we left it (focused on the local copy of our Azure Repo).

If you remember from previous posts, the contents of the Azure Repo networknerd-repo1 exist inside C:\Users\Nick\Documents\VSCode\Azure Repos\networknerd-repo1 on my laptop. Since we had created the VS Code Testing folder inside the repo already, let’s create a local subdirectory called networknerd3 to use for our testing. The full path to this folder (locally) will be C:\Users\Nick\Documents\VSCode\Azure Repos\networknerd-repo1\VS Code Testing\networknerd3.

Go to the Azure Functions extension in VS Code, and create a new project. This part does not tie the project we create to any specific Function App. We’ll do that in the Deployment Center. It just helps give us a foundation to start creating some functions (at least locally).

When the Select Folder window opens, click on the networknerd3 folder we created above, and click Select.

Go ahead and choose HttpTrigger as the template for this project’s first function.

Name the function FN1-HTTP1-NN3, use a namespace of NetworkNerd.Functions, and set AccessRights to Function (steps not found here but can be seen in this post). That should create the project and pop open a code window showing the contents of FN1-HTTP1-NN3.cs. In my case, there was an unresolved dependency message in VS Code, so I clicked the Restore button shown in the below screenshot.

Once the restore completed, here’s the message shown in the OUTPUT window. That is a message from NuGet (read this post for more on what it is and what it does) and looks similar to warnings we saw the first time we created and tried to deploy a function straight to Azure.

And here’s the full text version for reference.
c:\Users\Nick\Documents\VSCode\Azure Repos\networknerd-repo1\VS Code Testing\networknerd3\networknerd3.csproj : warning NU1603: Microsoft.Azure.WebJobs.Extensions 3.0.5 depends on Microsoft.Azure.WebJobs.Host.Storage (>= 3.0.11) but Microsoft.Azure.WebJobs.Host.Storage 3.0.11 was not found. An approximate best match of Microsoft.Azure.WebJobs.Host.Storage 3.0.13 was resolved.

Restore completed in 1.15 sec for c:\Users\Nick\Documents\VSCode\Azure Repos\networknerd-repo1\VS Code Testing\networknerd3\networknerd3.csproj.
We’ll go ahead and change the azureFunctions.projectRuntime to “~3” inside the proper settings.json file in our repo since it was set back to “~2” when this project was created and save those changes.

If we look in the source control area, there are only 8 untracked changes. So for now, the project containing the function code has been created, and Git sees the file changes. Let’s not commit anything yet.

If we go back to the FN1-HTTP1-NN3.cs file and press F5 to run a build, we find we are able to test the function locally with success (steps not shown). In the TERMINAL window, we see some familiar warnings to those described in this post.

And here’s the full text warnings for reference and searchability.
C:\Users\Nick\Documents\VSCode\Azure Repos\networknerd-repo1\VS Code Testing\networknerd3\networknerd3.csproj : warning NU1603: Microsoft.Azure.WebJobs.Extensions 3.0.5 depends on Microsoft.Azure.WebJobs.Host.Storage (>= 3.0.11) but Microsoft.Azure.WebJobs.Host.Storage 3.0.11 was not found. An approximate best match of Microsoft.Azure.WebJobs.Host.Storage 3.0.13 was resolved.

Restore completed in 691.64 ms for C:\Users\Nick\Documents\VSCode\Azure Repos\networknerd-repo1\VS Code Testing\networknerd3\networknerd3.csproj.

C:\Users\Nick\Documents\VSCode\Azure Repos\networknerd-repo1\VS Code Testing\networknerd3\networknerd3.csproj : warning NU1603: Microsoft.Azure.WebJobs.Extensions 3.0.5 depends on Microsoft.Azure.WebJobs.Host.Storage (>= 3.0.11) but Microsoft.Azure.WebJobs.Host.Storage 3.0.11 was not found. An approximate best match of Microsoft.Azure.WebJobs.Host.Storage 3.0.13 was resolved.

networknerd3 -> C:\Users\Nick\Documents\VSCode\Azure Repos\networknerd-repo1\VS Code Testing\networknerd3\bin\Debug\netcoreapp2.1\bin\networknerd3.dll
The question is…should we care about these warnings? My suspicion is the answer is no. We’ll see if I’m right as we press forward. If not, I will show how to come back and fix the problem.
Back to the Deployment Center
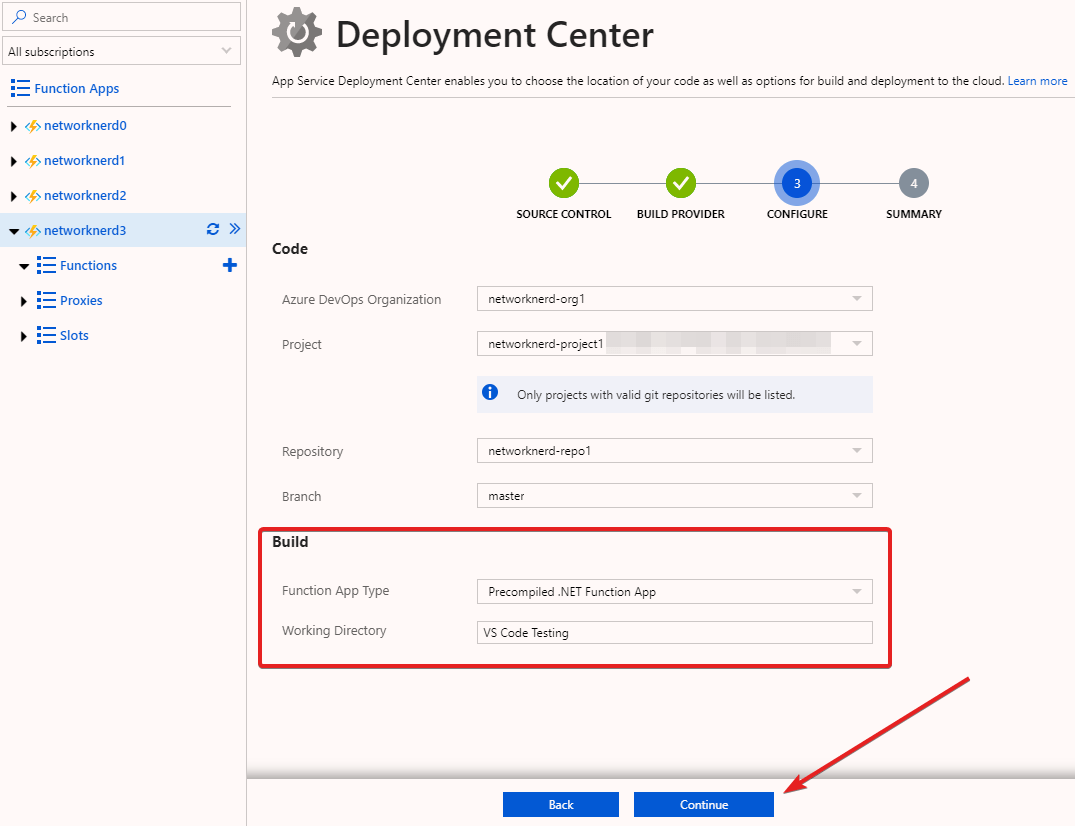
At the end of the previous post in this series, we were running through the Deployment Center workflow for the Function App networknerd3. Many times when dealing with autoconfiguration wizards like Deployment Center, we tend to roll with default settings unless we know they need to be changed. The critical decision point is in the Build section. By default, Function App Type will be set to Script Function App. But, since we’re using C# and not C# scripts in VS Code to build our functions, be sure to select Precompiled .NET Function App to highlight the type of code that can be found in our Azure repo (networknerd-repo1). The Working Directory is set to VS Code Testing. That field is a path relative to the root of the repository, and since VS Code Testing is the only folder in the repository now, that should work. This directory is where the output of a build pipeline is dropped for use by a release pipeline (more on that later). Let’s click Continue and see what happens.
And now we reach the confirmation screen. Note that the Repository field shows the full path to your Azure repo. Let’s click Finish and see what happens.

We can see based on the messages below that something was successful, but what exactly was successful?


As shown below, there was both and build and a release pipeline created for the Function App networknerd3.

A Tale of Two Pipelines
If we follow the link for Build Pipeline from the screen above, we see what follows inside Azure DevOps. Our build pipeline is named networknerd3 – CI. That name is automatically generated and can easily be changed. This pipeline exists inside Azure DevOps organization networknerd-org1 and project networknerd-project1. We saw above that a build was triggered, and it appears from what we see here something failed. The CI added to the pipeline name stands for continuous integration.

This build pipeline has been configured to detect Precompiled .NET code inside our existing Azure repo (networknerd-repo1) and run any time there is a code change. We intend to store our code inside the VS Code Testing folder within the repo. At the time this pipeline was run, there was no code in that folder.
![]()
If we click on the specific run of the build pipeline above, we can see more detail on what happened to throw an error. The Build job in the job list below obviously failed because our working directory for this pipeline contained no Azure Function code.

If we had clicked on the Release Pipeline link above, we would see that a release pipeline named networknerd3 – CD was created. It exists within the same Azure DevOps organization and project as the build pipeline and repo. We don’t see any releases or even failed attempts at this stage. Wait a minute…why is that?

The CD added to the pipeline’s name when it was created stands for continuous delivery. And if you noticed in the screenshot from our work in Deployment Center, continuous delivery was setup for us automatically. That means once a build pipeline runs successfully, it produces a file in the working directory of our repo (specified earlier as VS Code Testing), and the release pipeline takes it and uses it to update the code for anything inside the context of the Function App networknerd3 that has changed since the previous release.
Letting the Code Flow
Our Function App networknerd3 contains no functions at the moment.
![]()
But, we have some code in VS Code that will create the HTTP Trigger function FN1-HTTP1-NN3 once deployed to Azure. Inside VS Code, go ahead and commit all changes with Git.

Add the comment of your choice, and press Enter to confirm.

Remember to synchronize the changes in VS Code so all changes get pushed to our repo networknerd-repo1.
![]()
Our build pipeline has been configured to monitor the repo for new commits, so let’s check to see if the pipeline ran and if it ran successfully. If we look at the pipeline run details, we can see our commit comment as part of the pipeline run event. Unfortunately this run of the pipeline has failed. Click on Agent job 1 to get more detail.

As a quick note, there would still be no run of the release pipeline in this case since we didn’t get a successful build. Looking at the job details, some steps succeeded, but unfortunately the Build solution step failed. Click on this step for more detail.

There’s some kind of search firing off at this step that targets a .sln file and finds nothing.

Here’s the raw log for searchability:
2020-07-03T21:58:45.8180561Z ##[section]Starting: Build solution

2020-07-03T21:58:45.8301989Z ==============================================================================

2020-07-03T21:58:45.8302350Z Task         : Visual Studio build

2020-07-03T21:58:45.8302676Z Description  : Build with MSBuild and set the Visual Studio version property

2020-07-03T21:58:45.8302985Z Version      : 1.166.2

2020-07-03T21:58:45.8303221Z Author       : Microsoft Corporation

2020-07-03T21:58:45.8303586Z Help         : https://docs.microsoft.com/azure/devops/pipelines/tasks/build/visual-studio-build

2020-07-03T21:58:45.8304015Z ==============================================================================

2020-07-03T21:58:48.0082862Z ##[error]Solution not found using search pattern 'D:\a\1\s\**\*.sln'.

2020-07-03T21:58:48.0421403Z ##[section]Finishing: Build solution
This part stumped me for so much longer that I thought it would. Think back to the files we committed to our repo. None of them were .sln files. In fact, a .sln file is something created by Visual Studio. It turns out VS Code can open a .sln file, but I didn’t find where VS Code has the capability to create them. We did create a .csproj file though using the Azure Functions extension in VS Code that was uploaded along with our commit. Maybe we can leverage that somehow.
A Little Pipeline Repair Needed
Go back to the pipeline networknerd3 – CI for second. Remember all the steps we saw from the job details earlier? Maybe there’s something in those steps we need to tweak. As shown here, click the Edit button to get more detail on the job that makes up this pipeline.

Now we’re looking behind the curtain. We can see the tasks that make up Agent job 1 and the order in which they execute. I won’t go into a detailed explanation of NuGet, but it’s something we saw inside VS Code from earlier posts (check out this doc to learn more). That last task called Publish Artifact has to succeed to create a file used by the release pipeline to push out changes. We can see in the parameters section below that the Path to solution is set to recursively look for .sln files inside our repo.

Since a .csproj file is all we have uploaded to the repo, let’s change that field slightly to look for .csproj files instead. Before we save the changes, take a look at the Triggers tab for a minute.

Notice continuous integration is configured with the repo networknerd-repo1, the branch is set to master, and the path is set to the root of the repo. This means any code commit to the repo (regardless of where in the repo) will run this pipeline to attempt a build. If you want to test this on your own, go to the root of the repo, add a simple .md file, and commit the changes. Then look at the build pipeline to confirm it ran as expected.

Let’s go ahead and change the Path filter to only include the directory we’re working with (VS Code Testing). Only code changes to that directory in the repo will cause the pipeline to run. Then click Save. We could technically hit Save and Queue to save the changes and attempt to re-run the pipeline, but we’ll run it manually in a minute.

Now we add a comment before committing the changes and hit Save. Make it something descriptive so you know what was changed.

If we go back to the pipeline, it’s not immediately obvious we’ve made any configuration changes. You’ll see an extra pipeline run event here because I verified a change to the root of the repo kicked off a pipeline run (for my own edification) before we changed the Path filters for the repo in the preceding steps. Go ahead and click Run pipeline.

At this point, don’t change any parameters. Just click Run, and we will watch what happens.

The job in the pipeline run event shows as Queued for a few seconds and then changes to Running. Click on Agent job 1 to see more detail.

If you happen to dig into the details like this for a running pipeline you can watch each step of the job as it runs. We’ve not quite made it to the Build solution step, but be patient.

This time our build succeeded! And, all steps in the job show to have finished successfully. It looks like using the .csproj file was the right thing to do. Though not obvious by looking only at the screenshots here, the build pipeline ends up creating a ZIP file (what is eventually referred to as an artifact) that is used by the corresponding release pipeline.

If we go up one level of detail to the pipeline event, here’s what we see. The green check next to the run event indicates success. As for the warnings, the first one was resolved by NuGet. I’m not sure about that second warning for the time being. Additionally, this build event shows a notice of 1 published. What might that mean? Click on it to see.

This screen indicates one artifact was published to be used by a release pipeline. The file was named 53.ZIP in this case, and the “drop” shown below is what triggers the release process to start.

Looking at all pipeline runs for networknerd3 – CI, we only have one success. I wonder if the release pipeline fired?

If we check the release pipeline, here’s what we see. The green check means the release succeeded, but click on Release-1 to see more detail.

We knew continuous deployment was enabled and can see the artifact generated from build pipeline event 20200703.5 triggered the release to happen. There is only one stage setup here (Production), but we could customize and add others. Click the Succeeded text to view logs like we did for the build pipeline.

As shown here, an Azure Function App Deploy task was completed successfully. And if you look into the details of the Download artifact step, it would show the artifact created from the build pipeline (53.ZIP) was used.

Checking Our Work
It looks like we have a successful build and release. Did it actually work to create a new function? If you happen to have the Deployment Center window open from earlier, it has now updated to show we’ve deployed something successfully to production within the context of the Function App networknerd3. Notice our function is there now (FN1_HTTP1_NN3). The Build referenced matches the build pipeline event, and clicking the link takes you to it. The Release number shown does not seem to match what we saw in the release pipeline (not sure why exactly), but clicking it takes you to the correct release we showed earlier.

If we click on the function created and get its URL, does it actually run in a browser successfully? You can see from the screenshot below that the answer is yes! This was just the canned HTTP trigger function template (no customizations to the code).
![]()
![]()
One Last Tweak
This wouldn’t be any fun without a grand finale. Can we make a change to the function’s code and have it pushed out automatically using our pipelines? We won’t show every step, but here’s what I suggest doing now:
-
- Go back to VS Code, and make a change to the code for the function we deployed. We will make a noticeable edit to the responseMessage string in FN1-HTTP1-NN3.cs and save the changes.

- Go back to VS Code, and make a change to the code for the function we deployed. We will make a noticeable edit to the responseMessage string in FN1-HTTP1-NN3.cs and save the changes.

-
- Commit changes, and then synchronize them with the Azure repo.
-
- Confirm build and release pipelines succeed.


- Confirm build and release pipelines succeed.
-
- Try re-running the function after this to see if there is a change.

- Try re-running the function after this to see if there is a change.


That last part was quick, but prove to yourself that changing the code will update the function on the Azure side automatically…all through the power of Azure Repos and Pipelines. This only scratches the surface of the types of CI / CD capabilities possible with Azure DevOps, but we will stop here for now.
Other Posts in This Series
- Part 1 – A First Voyage into Azure Functions and Function Apps
- Part 2 – Deploying Azure Functions with Visual Studio Code
- Part 3 – Push and Pull – Using VS Code with Azure Repos
- Part 4 – Azure Functions and C# Code Intricacies – An Azure Pipelines Prequel
- Part 5 – This post
- Part 6 – The Next Wave: Exploring Tanzu Observability’s Integration with Azure Functions
- Part 7 – Introduction to Distributed Tracing with Tanzu Observability and Azure Functions
- Part 8 – Coming soon!